LECTURE №3
SENSORS
AND SIGNAL PROCESSING. SENSORS AND TRANSDUCERS
3.1.
SENSORS AND TRANSDUCERS
Measurement is an important subsystem of a
mechatronics system. Its main function is to collect the information on system
status and to feed it to the micro-processor(s)
for controlling the whole
system.
Measurement system comprises of sensors, transducers
and signal processing devices. Today a wide variety of these elements and devices are
available in the market. For a mechatronics system designer it is quite
difficult to choose suitable sensors/transducers for the desired
application(s). It is therefore essential to learn the principle of working of
commonly used sensors/transducers. A detailed consideration of the full range
of measurement technologies is, however, out of the scope of this
course. Readers are advised
to refer «Sensors
for mechatronics» by Paul P.L. Regtien, Elsevier, 2012 for more
information.
Sensors in manufacturing are basically employed to
automatically carry out the production operations as well as process monitoring
activities. Sensor technology has the following important advantages in
transforming a conventional manufacturing unit into a modern one:
1.
Sensors alarm
the system operators about the failure of any of the sub units of manufacturing
system. It helps operators to reduce the downtime of complete manufacturing
system by carrying out the preventative measures;
2.
Reduces
requirement of skilled and experienced labors;
3.
Ultra-precision
in product quality can be achieved.
Sensor
It is defined as an element which produces signal
relating to the quantity being measured. According to the Instrument Society of
America, sensor can be defined as «A device which provides a usable output in response to
a specified measurand». Here, the output is usually an «electrical quantity» and measurand is a «physical quantity, property or condition which is to
be measured».
Thus in the case of, say, a variable inductance displacement element, the
quantity being measured is displacement and the sensor transforms an input of
displacement into a change in inductance.
Transducer
It is defined as an element when subjected to some
physical change experiences a related change
or an element which converts
a specified measurand into a usable output by using a transduction principle.
It can also be defined as a device that converts a signal from one form of
energy to another form.
A wire of Constantan alloy (copper-nickel 55-45%
alloy) can be called as a sensor because variation in mechanical displacement
(tension or compression) can be sensed as change in electric resistance. This
wire becomes a transducer with appropriate electrodes and input-output
mechanism attached to it. Thus we can say that «sensors are transducers».
Sensor/transducers specifications
Transducers or measurement systems are not perfect
systems. Mechatronics design engineer must know the capability and shortcoming
of a transducer or measurement system to properly assess its performance. There
are a number of performance related parameters of a transducer or measurement
system. These parameters are called as sensor specifications.
Sensor specifications inform the user to the about
deviations from the ideal behavior of the sensors. Following are the various
specifications of a sensor/transducer system.
1. Range
The range of a sensor indicates the limits between
which the input can vary. For example, a thermocouple for the measurement of
temperature might have a range of 25-225 °C.
2. Span
The span is difference between the maximum and minimum
values of the input. Thus, the above-mentioned thermocouple will have a span of
200 °C.
3. Error
Error is the difference between the result of the
measurement and the true value of the quantity being measured. A sensor might
give a displacement reading of 29.8 mm, when the actual displacement had been
30 mm, then the error is –0.2 mm.
4. Accuracy
The accuracy defines the closeness of the agreement
between the actual measurement result and a true value of the measurand. It is
often expressed as a percentage of the full range output or full–scale
deflection. A piezoelectric transducer
used to evaluate dynamic pressure phenomena associated with explosions,
pulsations, or dynamic pressure conditions in motors, rocket engines,
compressors, and other pressurized devices is capable to detect pressures
between 0.1 and 10,000 psig (0.7 KPa to 70 MPa). If it is specified with the
accuracy of about ±1% full scale, then the reading given can be expected to be
within ± 0.7 MPa.
5. Sensitivity
Sensitivity of a sensor is defined as the ratio of
change in output value of a sensor to the per unit change in input value that
causes the output change. For example, a general purpose thermocouple may have
a sensitivity of 41 µV/°C.
6. Nonlinearity:
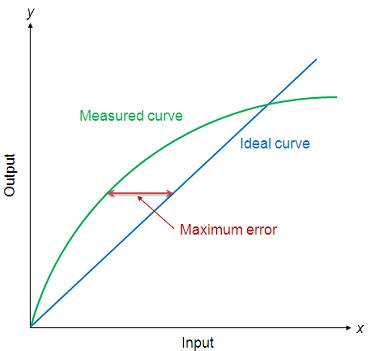
Fig. 3.1.1. Non-linearity
error
The nonlinearity indicates
the maximum deviation of the actual measured curve of a sensor from the ideal
curve. Figure 3.1.1 shows a
somewhat exaggerated relationship between the ideal, or least squares fit, line
and the actual measured or calibration line. Linearity is often specified in
terms of percentage of nonlinearity, which is defined as:
Nonlinearity (%) = Maximum
deviation in input ⁄ Maximum full scale input (3.1.1)
The static nonlinearity
defined by Equation 3.1.1 is
dependent upon environmental factors, including temperature, vibration,
acoustic noise level, and humidity. Therefore it is important to know under
what conditions the specification is valid.
7. Hysteresis:
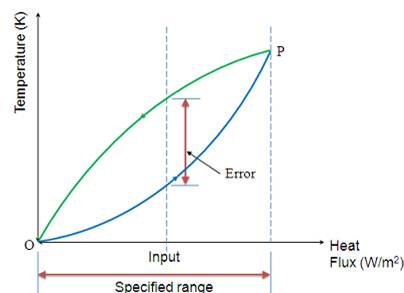
Fig. 3.1.2. Hysteresis
error curve
The hysteresis is an error
of a sensor, which is defined as the maximum difference in output at any
measurement value within the sensor’s specified range when approaching the
point first with increasing and then with
decreasing the input parameter. Figure 3.1.2 shows the hysteresis error
might have occurred during measurement of temperature using a thermocouple. The
hysteresis error value is normally specified as a positive or negative
percentage of the specified input range.
8. Resolution
Resolution is the smallest
detectable incremental change of input parameter that can be detected in the
output signal. Resolution can be expressed either as a proportion of the
full-scale reading or in absolute terms. For example, if a LVDT sensor measures
a displacement up to 20 mm and it provides an output as a number between 1 and
100 then the resolution of the sensor device is 0.2 mm.
9. Stability
Stability is the ability of
a sensor device to give same output when used to measure a constant input over
a period of time. The term ‘drift’ is used to indicate the change in output
that occurs over a period of time. It is expressed as the percentage of full
range output.
10. Dead band/time
The dead band or dead space
of a transducer is the range of input values for which there is no output. The
dead time of a sensor device is the time duration from the application of an
input until the output begins to respond or change.
11. Repeatability
It specifies the ability of
a sensor to give same output for repeated applications of same input value. It
is usually expressed as a percentage of the full range output: Repeatability =
(maximum – minimum values given) X 100 ⁄ full
range (3.1.2).
12. Response time
Response time describes the
speed of change in the output on a step-wise change of the measurand. It is
always specified with an indication of input step and the output range for
which the response time is defined.
Classification
of sensors
Sensors can be classified
into various groups according to the factors such as measurand, application
fields, conversion principle, energy domain of the measurand and thermodynamic
considerations. These general classifications of sensors are well described in
the references [2; 3].
Detail classification of
sensors in view of their applications in manufacturing is as follows:
a) displacement, position
and proximity sensors:
·
potentiometer;
·
strain-gauged
element;
·
capacitive
element;
·
differential
transformers;
·
eddy current
proximity sensors;
·
inductive
proximity switch;
·
optical encoders;
·
pneumatic
sensors;
·
proximity
switches (magnetic);
·
hall effect
sensors.
b) velocity and motion:
·
incremental
encoder;
·
tachogenerator;
·
pyroelectric
sensors;
c) force:
·
strain gauge
load cell.
d) fluid pressure:
·
diaphragm
pressure gauge;
·
capsules, bellows,
pressure tubes;
·
piezoelectric
sensors;
·
tactile sensor.
e) liquid flow:
·
orifice plate;
·
turbine meter.
f) liquid level:
·
floats;
·
differential
pressure.
g) temperature:
·
bimetallic
strips;
·
resistance
temperature detectors;
·
thermistors;
·
thermo-diodes
and transistors;
·
thermocouples;
·
light sensors;
·
photo diodes;
·
photo resistors;
·
photo
transistor.
3.2.
DISPLACEMENT SENSORS
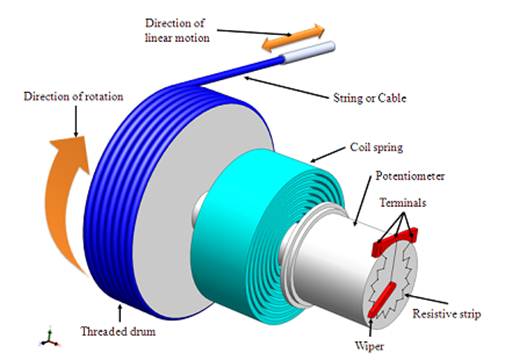
Fig. 3.2.1. Schematic of a
potentiometer sensor for measurement
of linear
displacement
Figure 2.2.1 shows the
construction of a rotary type potentiometer sensor employed to measure the
linear displacement. The potentiometer can be of linear or angular type. It
works on the principle of conversion of mechanical displacement into an
electrical signal. The sensor has a resistive element and a sliding contact
(wiper). The slider moves along this conductive body, acting as a movable
electric contact.
The object of whose
displacement is to be measured is connected to the slider by using:
·
a rotating shaft
(for angular displacement);
·
a moving rod (for
linear displacement);
·
a cable that is
kept stretched during operation.
The resistive element is a wire wound track or
conductive plastic. The track comprises of large number of closely packed turns
of a resistive wire. Conductive plastic is made up of plastic resin embedded
with the carbon powder. Wire wound track
has a resolution of the order of ± 0.01
% while the conductive plastic may have
the resolution of about 0.1 µm. During the sensing operation, a voltage Vs is applied across the resistive element.
A voltage divider circuit is formed when slider comes into contact with the
wire. The output voltage (VA) is
measured as shown in the figure 3.2.2. The output voltage is proportional to
the displacement of the slider over the wire. Then the output parameter
displacement is calibrated against the output voltage VA.
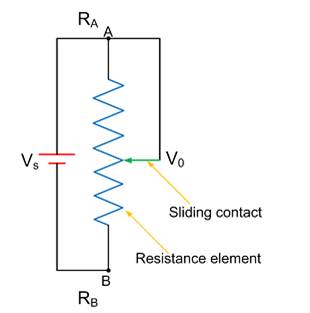
Fig. 3.2.2. Potentiometer:
electric circuit
Applications of
potentiometer
These sensors are primarily
used in the control systems with a feedback loop to ensure that the moving
member or component reaches its commanded position. These are typically used on
machine-tool controls, elevators, liquid-level assemblies, forklift trucks,
automobile throttle controls. In manufacturing, these are used in control of
injection molding machines, woodworking machinery, printing, spraying,
robotics, etc. These are also used in
computer-controlled monitoring of sports equipment.
3.3.
APPLICATIONS OF CAPACITIVE ELEMENT SENSORS
Applications of capacitive
element sensors:
·
Feed hopper
level monitoring;
·
Small vessel
pump control;
·
Grease level
monitoring ;
·
Level control of
liquids.
Metrology applications:
·
to measure shape
errors in the part being produced;
·
to analyze and
optimize the rotation of spindles in various machine tools such as surface
grinders, lathes, milling machines, and air bearing spindles by measuring
errors in the machine tools themselves.
Assembly line testing:
·
to test
assembled parts for uniformity,
thickness or other design features;
·
to detect the
presence or absence of a certain component, such as glue etc.
Linear variable
differential transformer (LVDT)

Fig. 3.3.1. Construction of
a LVDT sensor
Linear variable differential
transformer (LVDT) is a primary transducer used for measurement of linear
displacement with an input range of about ± 2 to ± 400 mmin general. It has
non-linearity error ± 0.25% of full range. Figure 2.2.6 shows the construction
of a LVDT sensor. It has three coils symmetrically spaced along an insulated
tube. The central coil is primary coil and the other two are secondary coils.
Secondary coils are connected in series in such a way that their outputs oppose
each other. A magnetic core attached to the element of which displacement is to
be monitored is placed inside the insulated tube.
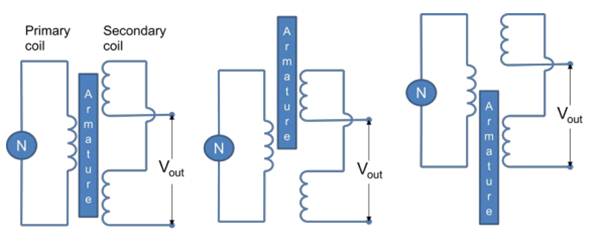
Fig. 3.3.2. Working of
LVDT sensor
Due to an alternating
voltage input to the primary coil, alternating electro-magnetic forces (emfs)
are generated in secondary coils. When the magnetic core is centrally placed
with its half portion in each of the secondary coil regions then the resultant
voltage is zero. If the core is displaced from the central position as shown in
Figure 3.3.2, say, more in secondary coil 1 than in coil 2, then more emf is
generated in one coil i.e. coil 1 than the other, and there is a resultant voltage
from the coils. If the magnetic core is further displaced, then the value of
resultant voltage increases in proportion with the displacement. With the help
of signal processing devices such as low pass filters and demodulators, precise
displacement can be measured by using LVDT sensors.
LVDT exhibits good
repeatability and reproducibility. It is generally used as an absolute position
sensor. Since there is no contact or sliding between the constituent elements
of the sensor, it is highly reliable. These sensors are completely sealed and
are widely used in Servomechanisms, automated measurement in machine tools.
A rotary variable
differential transformer (RVDT) can be used for the measurement of rotation.
Readers are suggested to prepare a report on principle of working and
construction of RVDT sensor.
Applications of
LVDT sensors
Applications of LVDT
sensors:
·
Measurement of
spool position in a wide range of servo valve applications;
·
To provide
displacement feedback for hydraulic cylinders;
·
To control weight
and thickness of medicinal products viz. tablets or pills;
·
For automatic
inspection of final dimensions of products being packed for dispatch;
·
To measure
distance between the approaching metals during Friction welding process;
·
To continuously
monitor fluid level as part of leak detection system;
·
To detect the
number of currency bills dispensed by an ATM.
In the next module we will study the various sensors,
signal conditioning devices and data conversion devices which are commonly used
in mechatronics and manufacturing automation.

