LECTURE № 2
MECHATRONICS: PRODUCTS AND
SYSTEMS IN MANUFACTURING
2.1. COMPUTER
NUMERICAL CONTROL (CNC) MACHINES
CNC machine is the best and
basic example of application of Mechatronics in manufacturing automation.
Efficient operation of conventional machine tools such as Lathes, milling
machines, drilling machine is dependent on operator skill and training. Also a
lot of time is consumed in workpart setting, tool setting and controlling the
process parameters viz. feed, speed, depth of cut. Thus conventional machining
is slow and expensive to meet the challenges of frequently changing
product/part shape and size.
Computer numerical control
(CNC) machines are now widely used in small to large scale industries. CNC
machine tools are integral part of Computer Aided Manufacturing (CAM) or
Computer Integrated Manufacturing (CIM) system. CNC means operating a machine tool by a series of coded
instructions consisting of numbers, letters of the alphabets, and symbols which
the machine control unit (MCU) can understand. These instructions are converted
into electrical pulses of current which the machine’s motors and controls
follow to carry out machining operations on a workpiece. Numbers, letters, and
symbols are the coded instructions which refer to specific distances,
positions, functions or motions which the machine tool can understand.

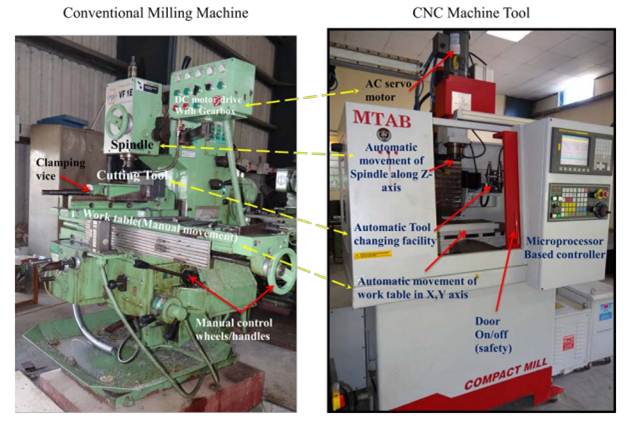
Fig. 2.1.1. Comparison
between a conventional machine tool and
a CNC machine
tool
Computer numerical control
(CNC) machines are now widely used in small to large scale industries. CNC
machine tools are integral part of Computer Aided Manufacturing (CAM) or
Computer Integrated Manufacturing (CIM) system. CNC means operating a machine tool by a series of coded
instructions consisting of numbers, letters of the alphabets, and symbols which
the machine control unit (MCU) can understand. These instructions are converted
into electrical pulses of current which the machine’s motors and controls
follow to carry out machining operations on a workpiece. Numbers, letters, and
symbols are the coded instructions which refer to specific distances,
positions, functions or motions which the machine tool can understand.
CNC automatically guides the
axial movements of machine tools with the help of computers. The auxiliary
operations such as coolant on-off, tool change, door open-close are automated
with the help of micro-controllers. Figure 1.2.1 shows the fundamental
differences between a conventional and a CNC machine tool. Manual operation of
table and spindle movements is automated by using a CNC controllers and servo
motors. The spindle speed and work feed can precisely be controlled and
maintained at programmed level by the controller. The controller has self
diagnostics facility which regularly alarms the operator in case of any safety
norm violation viz. door open during machining, tool wear/breakage etc. Modern
machine tools are now equipped with friction-less drives such as re-circulating
ball screw drives, Linear motors etc. The detail study of various elements of
such a Mechatronics based system is the primary aim of this course and these
are described at length in the next modules.
2.2. TOOL
MONITORING SYSTEMS
Uninterrupted machining is
one of the challenges in front manufacturers to meet the production goals and
customer satisfaction in terms of product quality. Tool wear is a critical
factor which affects the productivity of a machining operation. Complete automation
of a machining process realizes when there is a successful prediction of tool
(wear) state during the course of machining operation. Mechatronics based cutting tool-wear
condition monitoring system is an integral part of automated tool rooms and unmanned
factories. These systems predict the tool wear and give alarms to the system
operator to prevent any damage to the machine tool and workpiece. Therefore it
is essential to know how the mechatronics is helping in monitoring the tool
wear. Tool wear can be observed in avariety of ways. These can be classified in
two groups (Table 2.2.1).
Table 2.2.1
Tool monitoring systems
|
Direct methods |
Indirect
methods |
|
Electrical resistance |
Torque and power |
|
Optical measurements |
Temperature |
|
Machining hours |
Vibration and acoustic emission |
|
Contact sensing |
Cutting forces and strain measurements |
Direct methods deal with the
application of various sensing and measurement instruments such as micro-scope,
machine/camera vision; radioactive techniques to measure the tool wear. The
used or worn-out cutting tools will be taken to the metrology or inspection
section of the tool room or shop floor where they will be examined by using one
of direct methods. However, these methods can easily be applied in practice when
the cutting tool is not in contact with the work piece. Therefore they are
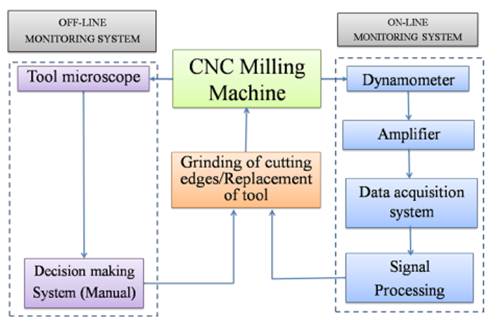
called as offline tool monitoring system. Figure 2.2.1 shows a schematic of
tool edge grinding or replacement scheme based on the measurement carried out
using offline tool monitoring system. Offline methods are time consuming and
difficult to employ during the course of an actual machining operation at the
shop floor.
Indirect methods predict the condition of the cutting
tool by analyzing the relationship between cutting conditions and response of
machining process as a measurable quantity through sensor signals output such
as force, acoustic emission, vibration, or current.

Fig. 2.2.1. Off-line and
on-line tool monitoring system for tool edge grinding
Figure 2.2.1 shows a typical example of an on-line
tool monitoring system. It employs the cutting forces recoded during the
real-time cutting operation to predict the tool-wear. The cutting forces can be
sensed by using either piezo-electric or strain gaugebased force transducer. A micro-processor
based control system continuously monitors «conditioned» signals received from
the Data Acquisition System (DAS). It is generally programmed/trained with the
past recorded empirical data for a wide range of process conditions for a
variety of materials. Artificial Intelligence (AI) tools such as Artificial
Neural Network (ANN), Genetic Algorithm (GA) are used to train the
microprocessor based system on a regular basis. Based on this training the
control system takes the decision to change the tool or gives an alarm to the
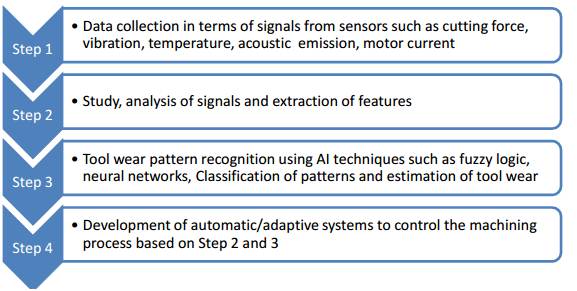
operator. Various steps followed in On-line approach to measure the tool wear
and to take the appropriate action are shown in Figure 2.2.3.
A lot of academic as well as industrial research has
been carried out on numerical and experimental studies of design, development
and analysis of «Tool Condition Monitoring Systems». Readers are suggested to
browse various international journals such as International Journal of Advanced
Manufacturing Technology (Springer), International Journal of Machine Tool and
Manufacture; International Journal of Materials Processing Technology
(Elsevier), etc. to learn more about these techniques.

Fig. 2.2.3. Steps followed
in an indirect tool monitoring system
Nowadays customers are
demanding a wide variety of products. To satisfy this demand, the manufacturers
«production» concept has moved away from «mass» to small «batch» type of
production. Batch production offers more flexibility in product manufacturing.
To cater this need, Flexible Manufacturing Systems (FMS) have been evolved.
As per Rao, P.N. [3], FMS
combines microelectronics and mechanical engineering to bring the economies of
the scale to batch work. A central online computer controls the machine tools,
other work stations, and the transfer of components and tooling.
The computer also provides
monitoring and information control. This combination of flexibility and overall
control makes possible the production of a wide range of products in small
numbers. FMS is a manufacturing cell or system consisting of one or more CNC
machines, connected by automated material handling system, pick-and-place
robots and all operated under the control of a central computer. It also has
auxiliary sub-systems like component load/unload station, automatic tool
handling system, tool pre-setter, component measuring station, wash station
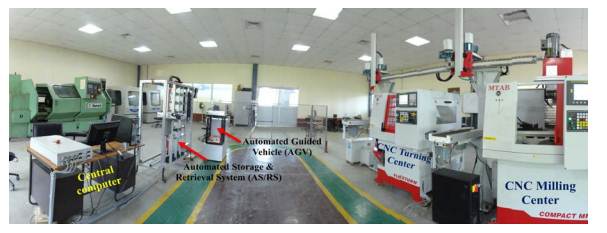
etc. Figure 2.2.4 shows a typical arrangement of FMS system and its
constituents. Each of these will have further elements depending upon the
requirement as given below.
A. Workstations
·
CNC machine
tools
·
Assembly
equipment
·
Measuring
Equipment
·
Washing stations
B. Material handing Equipment
·
Load unload
stations (Palletizing)
·
Robotics
·
Automated Guided
Vehicles (AGVs)
·
Automated
Storage and retrieval Systems (AS/RS)
C. Tool systems
·
Tool setting
stations
·
Tool transport
systems
D. Control system
·
Monitoring
equipments
·
Networks
It can be noticed that the
FMS is shown with two machining centers viz. milling center and turning center.
Besides it has the load/unload stations, AS/RS for part and raw material
storage, and a wire guided AGV for transporting the parts between various
elements of the FMS. This system is fully automatic means it has automatic tool
changing (ATC) and automatic pallet changing (APC) facilities. The central
computer controls the overall operation and coordination amongst the various
constituents of the FMS system. Video attached herewith gives an overview of a
FMS system.

Fig. 2.2.4. A FMS Setup
The characteristic features
of an FMS system are as follows:
1.
FMS solves the
mid-variety and mid-volume production problems for which neither the high
production rate transfer lines nor the highly flexible stand-alone CNC machines
are suitable;
2.
Several types of
a defined mix can be processed simultaneously;
3.
Tool change-over
time is negligible;
4.
Part handling
from machine to machine is easier and faster due to employment of computer
controlled material handling system.
Benefits of an FMS:
·
Flexibility to
change part variety
·
Higher
productivity
·
Higher machine
utilization
·
Less rejections
·
High product
quality
·
Reduced
work-in-process and inventory
·
Better control
over production
·
Just-in-time
manufacturing
·
Minimally manned
operation
·
Easier to expand
2.3.
COMPUTER
INTEGRATED MANUFACTURING (CIM)
In the last lecture, we have
seen that a number of activities and operations viz. designing, analyzing,
testing, manufacturing, packaging, quality control, etc. are involved in the
life cycle of a product or a system (see Figure 1.1.4). Application of principles of
automation to each of these activities enhances the productivity only at the
individual level. These are termed as «islands of automation». Integrating all these islands of automation into a
single system enhances the overall productivity. Such a system is called as «Computer Integrated Manufacturing (CIM)».
The Society of Manufacturing
Engineers (SME) defined CIM as CIM is the integration of the total
manufacturing enterprise through the use of integrated systems and data
communications coupled with new managerial philosophies that improve
organizational and personal efficiency.
CIM basically involves the
integration of advanced technologies such as computer aided design (CAD),
computer aided manufacturing (CAM), computer numerical control (CNC), robots,
automated material handling systems, etc. Today CIM has moved a step ahead by
including and integrating the business improvement activities such as customer
satisfaction, total quality and continuous improvement. These activities are
now managed by computers. Business and marketing teams continuously feed the
customer feedback to the design and production teams by using the networking
systems. Based on the customer requirements, design and manufacturing teams can
immediately improve the existing product design or can develop an entirely new
product. Thus, the use of computers and automation technologies made the
manufacturing industry capable to provide rapid response to the changing
needs of customers.
2.4.
INDUSTRIAL ROBOTS
Industrial robots are
general-purpose, re-programmable machines which respond to the sensory signals
received from the system environment. Based on these signals, robots carry out
programmed work or activity. They also take simple independent decisions and
communicate/interact with the other machines and the central computer. Robots
are widely employed in the following applications in manufacturing:
a) Parts handling: it involves various
activities such as:
·
Recognizing,
sorting/separating the parts;
·
Picking and
placing parts at desired locations;
·
Palletizing and de-palletizing;
·
Loading and
unloading of the parts on required machines.
b) Parts processing: this may involves many
manufacturing operations such as:
·
Routing;
·
Drilling;
·
Riveting;
·
Arc welding;
·
Grinding;
·
Flame cutting;
·
Deburring;
·
Spray painting;
·
Coating;
·
Sand blasting;
·
Dip coating;
·
Gluing;
·
Polishing;
·
Heat treatment.
c) Product building: this involves development
and building of various products such as:
·
Electrical
motors;
·
Car bodies;
·
Solenoids;
·
Circuit boards
and operations like;
·
Bolting;
·
Riveting;
·
Spot welding;
·
Seam welding;
·
Inserting;
·
Nailing;
·
Fitting;
·
Adhesive bonding;
·
Inspection.
Further detail discussion on
various aspects of industrial robots such as its configuration, building
blocks, sensors, and languages has been carried out in the last module of this
course.
2.5.
AUTOMATIC QUALITY CONTROL AND INSPECTION SYSTEMS
Supply of a good quality
product or a system to the market is the basic aim of the manufacturing
industry. The product should satisfy the needs of the customers and it must be
reliable. To achieve this important product-parameter during a short lead time
is really a challenge to the manufacturing industry. This can be achieved by
building up the «quality» right from the product design stage; and maintaining
the standards during the «production
stages» till the
product-delivery to the market.
A number of sensors and
systems have been developed that can monitor quality continuously with or
without the assistance of the operator. These technologies include various
sensors and data acquisition systems, machine vision systems, metrology
instruments such as coordinate measuring machine (CMM), optical profilometers,
digital calipers and screw gauges etc. Now days the quality control activities
are being carried out right from the design stage of product development.
Various physics based simulation software is used to predict the performance of
the product or the system to be developed. In the manufacture of products such
as spacecrafts or airplanes, all the components are being critically monitored
by using the digital imaging systems throughout their development.
In the next module we will
study the various sensors, signal conditioning devices and data conversion
devices which are commonly used in mechatronics and manufacturing automation.

